Guest Posting in a Fast-Moving Media Landscape

Guest Posting in a Fast-Moving Media Landscape

News moves quickly, but useful reporting and analysis still take time to produce. For independent websites, contributed articles can bring fresh expertise to readers and broaden the range of voices in a publication. For writers and organizations, they offer a way to share knowledge with an audience beyond their own channels. The value depends on the quality of the work and how carefully it fits the site—not simply on how often a piece is published.

A thoughtful guest posting approach starts with the reader. Before pitching an article, consider what the publication covers, how its articles are structured, and what questions its audience may have. A good contribution should answer a real question or offer a useful perspective, rather than repeat material that readers can find everywhere.

Choose a topic that serves the publication

Begin by reviewing the site’s recent coverage. Look for subjects that appear regularly, gaps that have not been addressed, and the level of detail readers expect. A general news and media audience may respond to practical explanations of changing technology, digital publishing, public communication, or how a wider trend affects everyday decisions. A pitch should make the connection clear.

Specificity helps. Instead of proposing an article about “the future of media,” suggest an examination of how small newsrooms can verify images shared during a breaking story, or how publishers can make corrections easier for readers to find. The narrower idea is easier to assess, research, and shape into a useful article.

Pitch with clarity

Editors have limited time, so a concise pitch is more helpful than a lengthy introduction. State the proposed headline or topic, explain the central point, and identify why it suits that particular publication. If the subject involves a recent development, clarify what the article will add beyond a summary of the news. A timely piece can still offer context, practical steps, or a careful explanation of competing viewpoints.

It is also useful to be clear about what you can deliver. Mention relevant experience where it supports the proposal, but avoid treating credentials as a substitute for a strong idea. Editors need to understand the intended reader benefit and the likely scope of the piece.

Build the article around evidence

Once an idea is accepted, organize the article so readers can follow the argument. An opening paragraph should establish the issue and its importance. Use descriptive sections to break up complex material, and make each paragraph advance the explanation. When a claim depends on data, expert opinion, or a specific event, identify the basis for it and check that the information is current.

Careful sourcing matters especially in news-related writing. Distinguish verified information from interpretation, avoid overstating what a study or statement proves, and provide context that could change how a reader understands a figure. If details remain uncertain, say so plainly. Accuracy is not only about avoiding errors; it is also about showing the limits of what is known.

Make the editing process straightforward

A submission should be clean enough for an editor to assess without first correcting basic problems. Check names, dates, figures, spelling, and formatting. Remove repeated points and generic openings. If the publication provides guidelines, follow them on length, tone, and structure. A well-prepared draft leaves more room for meaningful editorial discussion.

Writers who need extra capacity may work with freelancers for research assistance, editing, design, or other production tasks. A marketplace such as Osdire brings buyers and freelancers together across more than 900 categories, including writing and translation, graphics and design, programming and tech, video, audio, photography, and marketing. Its flat pricing and payment process—where funds are held during an order and released after the buyer approves the work—can be relevant when planning a defined project. Regardless of who contributes, the publisher remains responsible for the accuracy and suitability of what appears under its name.

Think beyond publication day

Publishing is not the final measure of whether an article worked. Consider whether readers spent time with it, shared it, or raised useful questions in response. Those signals can help a writer refine future pitches and help an editor identify subjects worth revisiting. If the article includes a call to action, it should be relevant to the discussion and not distract from the information readers came for.

Contributed writing works best when all sides understand their roles. The writer brings a clear idea and careful research; the editor protects the publication’s standards; and the article gives readers something they can use or understand more fully. In a crowded media environment, that combination is more durable than volume alone. A focused topic, transparent evidence, and respectful editing can make a guest contribution a genuine part of a publication’s coverage rather than an interruption to it.

The Global Tapestry of Culture: Weaving Tradition and Comfort

The Global Tapestry of Culture: Weaving Tradition and Comfort

In an increasingly interconnected world, fashion and home decor serve as powerful conduits for cultural expression, heritage, and identity. What we wear and how we adorn our living spaces often tell a story—a narrative of where we’ve been, what we value, and where we’re going. This article explores how specific items, from the proudly worn African shirt to the comforting embrace of a sherpa blanket, become threads in the vibrant, global tapestry of culture.

The Pride of the African Shirt

african shirt

The African shirt, more than just a garment, is a statement of heritage and artistry. Characterized by vibrant colors, intricate patterns, and bold designs, these shirts are a celebration of the diverse cultures across the African continent. From the geometric precision of Kente cloth originating from Ghana and Togo, to the fluid, wax-resist patterns of Ankara (or Dutch wax print), each fabric and pattern carries historical significance, often communicating social status, familial lineage, or spiritual beliefs.

Wearing an African shirt transcends a simple fashion choice; it is an act of cultural affirmation. It can be seen on world stages, in professional settings, and at festive occasions, symbolizing pride, unity, and a connection to roots. Designers—both on the continent and in the diaspora—are continuously innovating, blending traditional textiles and motifs with contemporary cuts, ensuring the African shirt remains relevant and stylish for a global audience. The impact of this clothing goes far beyond aesthetics; it supports local economies, preserves artisanal skills, and educates the world about Africa’s rich textile legacy.

The Regal Statement of the African Hat

Complementing the shirt, the African hat serves as another crucial element of cultural attire, often bearing even deeper symbolic weight. Historically, headwear in Africa has indicated rank, wealth, and power. Consider the Zulu ceremonial headpieces, the Nigerian fila (often worn with the agbada), or the Senegalese kufi. Each style is distinct, reflecting regional identity and tradition.

The choice of fabric, the height of the crown, and the way the hat is folded or tied can all convey specific messages. For instance, the traditional Yoruba fila might be worn differently by a married man versus a bachelor. The African hat often completes the ensemble, providing a regal finish and a final punctuation mark to the wearer’s cultural narrative. Together, the African shirt and African hat form a powerful visual language that speaks volumes about identity and respect for ancestral traditions.

Barbados Clothing: Sun, Sea, and Style

Shifting focus to the Caribbean, the clothing of Barbados offers a different, yet equally compelling, cultural expression—one shaped by its island environment, history, and celebratory spirit. Barbados clothing is a vibrant blend of practical lightweight fabrics suited for the tropical climate and the elegant silhouettes demanded by both formal and festive island life.

Traditional attire often features bright colors that mirror the island’s stunning natural landscape—the turquoise of the sea, the gold of the sun, and the lush green of the foliage. While tourism has influenced modern fashion, traditional Barbadian styles for events like weddings, Crop Over festivals, or religious ceremonies emphasize tailored, yet breezy, linen and cotton. The clothing reflects the Bajan ethos: stylish, relaxed, and always ready for celebration. Whether it’s a flowing sundress or a crisp, colorful shirt, Barbados clothing embodies the warmth and hospitality of the “Gem of the Caribbean.”

Juneteenth Shirts: Commemorating Freedom

In the United States, an increasingly significant garment has emerged to mark a pivotal moment in history: the Juneteenth shirts. Juneteenth, celebrated on June 19th, commemorates the emancipation of enslaved African Americans. As the holiday has gained national recognition, clothing has become a key way for participants to express pride, remembrance, and solidarity.

Juneteenth shirts are generally designed with powerful symbolism. They often feature the official Juneteenth flag—with its star, burst, and arc—or incorporate Pan-African colors (red, black, and green) and symbols of freedom and resilience. These shirts act as wearable reminders of a long-fought journey, celebrating the freedom that arrived in Texas two and a half years after the Emancipation Proclamation. Wearing a Juneteenth shirt is a public act of education and celebration, honoring the past while looking forward to a more equitable future. It is a powerful example of how clothing can be imbued with deep historical and social meaning.

The Comfort of the Sherpa Blanket

Moving from personal attire to the home, the sherpa blanket offers a universal symbol of comfort, security, and warmth. Named after the Himalayan Sherpa people, the term “sherpa” in this context refers to a specific type of synthetic fabric designed to mimic the thick, cozy wool of sheep. This dual-sided textile—smooth knit on one side, fluffy fleece on the other—has become a household staple across the globe.

The popularity of the sherpa blanket lies in its simple, undeniable appeal: pure, unadulterated comfort. It represents the concept of hygge, or cozy contentment, and is a staple for movie nights, chilly evenings, or simply creating a snug sanctuary within the home. While it doesn’t carry the historical or cultural weight of an African shirt, its widespread adoption speaks to a universal human need for warmth and softness. The sherpa blanket grounds this exploration in the domestic sphere, reminding us that cultural comfort is found not just in the clothes we wear in public, but also in the textiles we choose for our most private spaces.

The Woven Connection

These five keywords—African shirt, African hat, Barbados clothing, Juneteenth shirts, and sherpa blanket—are disparate, yet they are all connected by the common thread of human expression through material culture. They showcase the dual role of textiles: to articulate deep-seated cultural narratives and to fulfill fundamental human needs for identity and comfort.

From the vibrant patterns that declare African heritage, to the lightweight fabrics that capture the spirit of Barbados, to the symbolic messages of freedom on Juneteenth shirts, and finally, to the insulating embrace of the sherpa blanket, our choices in clothing and textiles are rarely arbitrary. They form a rich, living library of history, geography, and personal meaning—a truly global tapestry woven with tradition, creativity, and the enduring quest for both meaning and warmth.

From Custody to Community: Re-entry Systems and Strategies

From Custody to Community: Re-entry Systems and Strategies

For those housed at a minimum-security facility, the years spent away are not merely about waiting; they are about preparing for a world that has likely changed since they left. Managing the transition at a place like Herlong Federal Prison Camp, California involves mastering specific bureaucratic systems that bridge the gap between a restricted life and a free one.

Mastering the Commissary Economy

The internal economy of the camp is the first place where an inmate practices modern financial responsibility. While the government provides basic prison food, it is often insufficient for long-term health and morale. To manage this, families use FBOP Moneygram to ensure the inmate’s trust fund is active.

  • Financial Limits: As of 2026, inmates at Herlong can typically spend up to $360 per month on commissary items.
  • Strategic Shopping: Inmates must learn to budget for the month, choosing between “luxury” items like electronics or practical additions to their diet. Because the provided prison food is high in sodium, many inmates use their funds to buy “cleaner” protein sources like mackerel or tuna pouches and brown rice.
  • The Power of Spices: Small purchases of hot sauce or garlic powder are essential for making standard institutional meals more palatable.

Leveraging the Digital Bridge

The transition to a digital world is one of the biggest hurdles for returning citizens. Using Trulincs allows inmates to maintain their “digital literacy.” Through this system, they can manage their contacts, monitor their financial accounts, and—most importantly—communicate with their support network.

Staying active on Trulincs is a core component of a re-entry plan. It allows an inmate to:

  • Coordinate with legal counsel regarding the First Step Act (FSA) time credits.
  • Communicate with family to secure the necessary documentation (IDs, Social Security cards) needed upon release.
  • Begin the preliminary search for Residential Reentry Centers (halfway houses) in their home district.

The Re-entry Roadmap: Actionable Steps

The process to rebuild my life after federal prison camp is a multi-phased endeavor that should ideally begin at least 18 months before the release date. At a facility like Herlong Federal Prison Camp, California, inmates have access to specific “Release Preparation Programs” that cover everything from resume writing to cognitive behavioral therapy.

To successfully rebuild my life after federal prison camp, inmates are encouraged to follow this checklist:

  1. Vocational Training: Enroll in available trades, such as HVAC, carpentry, or computer-related technologies, to ensure immediate employability.
  2. Savings Plan: Allocate a portion of every deposit made via  FBOP Moneygram into a “release fund” rather than spending it all at the commissary.
  3. Community Ties: Use Trulincs to maintain at least five solid, pro-social contacts who can provide housing leads or emotional support during the first 90 days of freedom.

Transitioning Beyond the Mainline

One of the hardest habits to break is the reliance on institutional structures. After years of eating prison food on a fixed schedule, the sudden abundance of choice in the outside world can be overwhelming. Re-entry programs often focus on “Life Skills,” teaching inmates how to navigate grocery stores, use modern banking apps, and manage a 40-hour work week.

At Herlong Federal Prison Camp, California, the goal of the staff and the inmate alike is to ensure that the “camp” is the final stop in the criminal justice system. By effectively using FBOP Moneygram for support, Trulincs for connection, and vocational programs for skill-building, an individual can lay the groundwork to truly rebuild my life after federal prison camp.

Roofing Process Step by Step: My Personal Guide From Mistakes to Mastery

Roofing Process Step by Step: My Personal Guide From Mistakes to Mastery

When I first tackled a roofing project, I had no clue how complicated the process really was. I thought it was just “rip the old shingles off, nail the new ones in, and boom—you’re done.” Let me tell you, I couldn’t have been more wrong. Roofing is a whole system, and every step has a purpose. Skip one, and you’ll be calling for repairs way sooner than you’d like.

In this guide, I’m breaking down the roofing process step by step, sharing what I learned the hard way, and sprinkling in some tips that will save you headaches (and money). Whether you’re hiring a contractor or just curious about how it all works, you’ll walk away with a solid understanding.

Step 1: Inspection and Planning

Before anything else, you’ve got to know what you’re dealing with. The first time I did a roof inspection, I skipped checking the attic for leaks. Huge mistake. A few weeks later, I noticed water stains on the ceiling because I ignored the inside view.

Here’s what I learned:

  • Walk around your home and look for sagging spots or missing shingles.
  • Check gutters for granules (a sign your shingles are deteriorating).
  • Don’t forget the attic—dark stains, mold, or damp insulation scream trouble.

Pro tip: Always take photos. I started doing this for reference and it helped me explain issues to contractors without sounding clueless.

Step 2: Choosing Materials

Roofing isn’t one-size-fits-all. Asphalt shingles, metal panels, clay tiles—each has pros and cons. I went with architectural shingles because they looked nice and had a decent lifespan. But I underestimated how hot my area gets. Asphalt absorbs heat like crazy, so now my attic feels like an oven in summer.

Lessons learned:

  • In hot climates, consider reflective metal roofing.
  • For coastal areas, corrosion-resistant materials are a must.
  • Budget matters, but don’t cheap out—roofing materials are a long-term investment.

Step 3: Stripping the Old Roof

This is where it gets messy. The first roof I helped with, we thought we could just nail new shingles over the old ones. Technically, you can, but it’s like putting a band-aid on a broken arm. Layers trap heat and moisture, leading to faster deterioration.

Stripping involves:

  1. Using a roofing shovel or pitchfork to pry up old shingles.
  2. Removing nails (and believe me, there will be thousands).
  3. Hauling debris to a dumpster—it fills up faster than you think.

Pro tip: Lay tarps on the ground to catch falling shingles and nails. I didn’t, and I ended up mowing over stray nails for weeks.

Step 4: Inspecting the Decking

Once the old shingles are gone, you’ll see the roof decking (the plywood or boards beneath). This step surprised me because I assumed the decking was always fine. Nope. On my neighbor’s roof, half the decking was rotted out from years of slow leaks.

Here’s what to do:

  • Walk carefully and check for spongy spots.
  • Replace any rotted or warped plywood.
  • Look for rusted nails or mold growth.

Skipping this is like building on a shaky foundation—it won’t last.

Step 5: Installing Underlayment

Underlayment is that protective layer between your shingles and the decking. Think of it as the raincoat for your roof. The first time, I went with cheap felt underlayment. Big mistake. It tore easily during installation, and we had to patch it before laying shingles.

Nowadays, synthetic underlayment is the way to go. It’s stronger, water-resistant, and much easier to handle. Installers roll it out, overlap seams, and secure it with cap nails or staples. If you’re in a storm-prone area, ice and water shield along the edges is a lifesaver—it prevents leaks from wind-driven rain or ice dams.

Step 6: Flashing Installation

Flashing is one of those things people barely notice until it fails. It’s the thin metal that seals roof edges, chimneys, vents, and valleys. I once had a small leak around a skylight because the flashing wasn’t installed right. The water damage cost me more than if I’d just paid attention upfront.

Tips I wish I knew sooner:

  • Always overlap flashing pieces so water flows downhill.
  • Use corrosion-resistant metal like aluminum or galvanized steel.
  • Don’t skimp on sealant—this step prevents hidden leaks.

Step 7: Laying Shingles or Roofing Material

Now for the part everyone pictures: installing the shingles. The first time, I thought it was all about hammering nails. Nope, there’s a whole pattern to follow. Start from the bottom edge (the eaves) and work your way up, staggering shingles to cover seams.

Things I learned the hard way:

  • Nail placement matters—too high and shingles blow off, too low and they leak.
  • Use 4 nails per shingle in calm areas, 6 nails in windy zones.
  • Don’t forget starter strips along the edges; they prevent wind uplift.

It’s slow, sweaty work, but it’s also satisfying to see the roof take shape.

Step 8: Installing Ridge Caps and Ventilation

When I skipped proper ventilation on one project, the attic turned into a sauna. Moisture built up, and within a year I saw mold spots. That’s when I realized ridge vents and soffit vents aren’t optional—they keep air circulating, protecting both your roof and your home.

Ridge cap shingles cover the peak of the roof, giving a finished look and sealing it off. Ventilation keeps everything breathing. If you notice your energy bills creeping up, poor roof ventilation could be the culprit.

Step 9: Cleaning Up the Site

Roofing creates an insane amount of debris. I learned the hard way when I stepped on a nail in the yard—yep, straight through my shoe. Since then, I swear by magnetic nail sweepers. They pick up stray nails like magic.

Other cleanup tips:

  • Rent a dumpster big enough—trust me, it fills fast.
  • Walk the property carefully before calling it done.
  • Don’t forget gutters—shingle granules clog them quickly.

Step 10: Final Inspection

This is the “check your work” moment. My first roof job, I skipped this step. Two weeks later, I had to climb back up because a flashing piece came loose.

Here’s what I do now:

  • Walk the roof and look for exposed nails.
  • Check flashing and sealant one more time.
  • Spray the roof with a hose to test for leaks (especially around chimneys and vents).

It feels tedious, but a thorough inspection saves you from callbacks or costly repairs.

Bonus Step: Maintenance Matters

Roofs aren’t “set it and forget it.” Every fall, I clean my gutters and check for missing shingles. After storms, I do a quick walk-around. Simple things like trimming overhanging branches also help prevent damage.

Think of roof maintenance like car maintenance—ignore it, and you’ll pay more later.

Wrapping It Up

The roofing process isn’t glamorous, but it’s one of the most important investments in your home. From stripping the old shingles to nailing down the last ridge cap, every step has its role. Mess up one, and the whole system suffers.

What I’ve learned is this: patience pays off. Rushing leads to leaks, frustration, and way more money down the road. Whether you’re DIY-ing or hiring pros, understanding the process step by step helps you make smarter decisions.

And if you’re ever tempted to skip the cleanup step, just remember my story about stepping on that nail—you’ll take it more seriously, I promise.

Frequently Asked Questions About the Roofing Process

  1. How long does the roofing process usually take?

The timeline depends on the size of the house, the weather, and the roofing material. A typical asphalt shingle roof on an average-sized home can be finished in 1 to 3 days. Metal roofing or tile roofing may take up to a week because they’re more complex to install. If there’s unexpected damage to the decking, it could add another day or two.

  1. What’s the best roofing material for hot climates?

From my experience, metal roofing is the top choice for hot regions because it reflects sunlight instead of absorbing it. Light-colored tiles and reflective shingles also work well. If you live somewhere with blazing summers, avoid dark asphalt shingles—they trap heat and drive up your energy bills.

  1. Can you install a new roof over old shingles?

Yes, but I wouldn’t recommend it. While some local building codes allow a second layer of shingles, it’s basically a shortcut. It adds extra weight to your roof, traps heat, and makes future repairs more expensive. Stripping the old roof first is always the smarter long-term decision.

  1. How much does a new roof cost?

Prices vary widely depending on material, labor, and location. On average in the U.S., asphalt shingle roofing costs $5,000 to $12,000 for a standard home. Metal or tile roofs can run much higher—sometimes $15,000 to $30,000. The key is to get at least three estimates and compare not just price but also warranties and materials.

  1. How do I know if my roof needs replacing or just repairs?

If you notice curled shingles, missing pieces, sagging areas, or leaks inside your home, it might be time for a full replacement. Small issues like a few missing shingles or minor flashing problems can often be repaired. When in doubt, have a professional roofer do an inspection—you don’t want to gamble with water damage.

  1. What is roof underlayment, and why is it important?

Underlayment is the protective barrier installed between your roof deck and shingles. Think of it as your roof’s safety net. It helps prevent leaks during heavy rain or snow, especially if wind-driven rain manages to sneak under your shingles. Synthetic underlayment is more durable than traditional felt and is what I recommend.

  1. How often should I inspect my roof?

A good rule of thumb is to inspect your roof twice a year—once in the spring and once in the fall. I also do a quick check after major storms. Look for missing shingles, damaged flashing, or clogged gutters. Regular inspections extend the life of your roof and catch problems before they snowball.

  1. Is roof ventilation really necessary?

Absolutely. Proper ventilation keeps your attic cooler in summer and reduces moisture buildup in winter. Without it, you risk mold growth, warped decking, and sky-high energy bills. Ridge vents, soffit vents, and gable vents all work together to keep airflow balanced.

  1. What’s the biggest mistake homeowners make during the roofing process?

Honestly, it’s skipping steps to save money or time. I’ve seen people ignore rotten decking, reuse old flashing, or skip cleanup—only to pay double later for repairs. Another common mistake is hiring the cheapest contractor without checking references. Roofing is one of those jobs where cutting corners comes back to haunt you.

  1. How long should a new roof last?

It depends on the material. Asphalt shingles typically last 20–30 years if maintained properly. Metal roofing can last 40–70 years, and clay or slate tiles can last even longer—sometimes over a century. Maintenance plays a big role, so don’t forget regular inspections and gutter cleaning.


Makkah Travel and Tours: A Personal Guide to Making the Journey of a Lifetime

Makkah Travel and Tours: A Personal Guide to Making the Journey of a Lifetime

Makkah Travel and Tours: A Personal Guide to Making the Journey of a Lifetime

Introduction: Why Makkah Travel Feels So Different

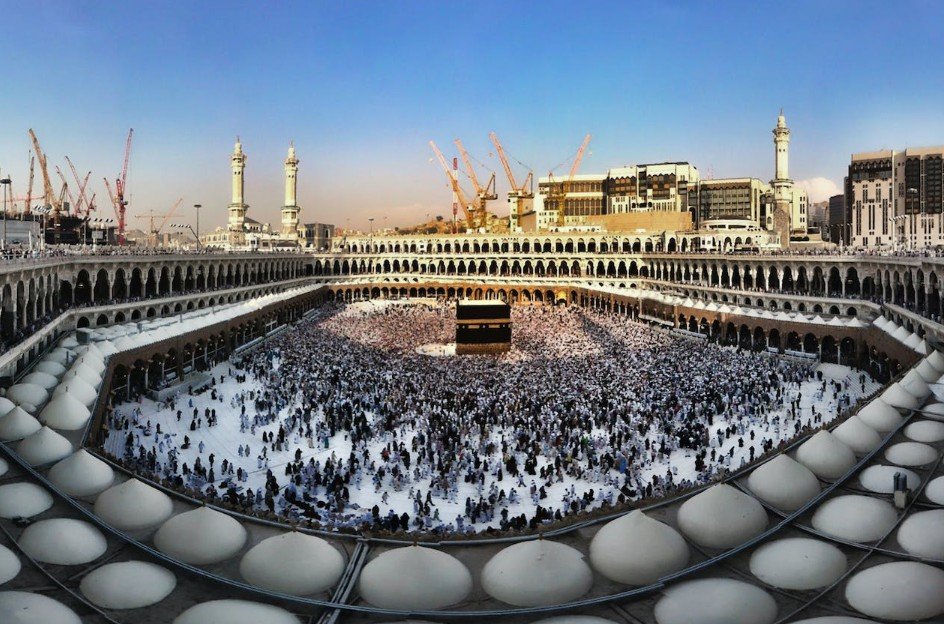
I’ll be honest, planning a trip to Makkah isn’t like booking a vacation to Bali or Paris. It’s not just about flights, hotels, and sightseeing—it’s about preparing your heart, your mind, and yes, even your patience. The first time I booked my Umrah trip, I thought it would be like any other travel planning. Big mistake. I forgot one small detail (a transit visa!) and nearly missed my connection in Dubai. That’s when I realized: Makkah travel and tours require a very different mindset.

This article is not going to be a stiff, formal guide. Instead, I’ll share my experiences—what worked, what didn’t, the blunders I made (like packing three pairs of heavy shoes… don’t do that), and the little hacks that made my trip smoother. Hopefully, it helps you prepare for your own journey to Makkah, whether it’s for Umrah or Hajj.

  1. Choosing Between Umrah and Hajj Packages

When people say Makkah tours, they usually mean two things: Hajj or Umrah. And let me tell you, the difference isn’t just in timing—it’s in cost, preparation, and energy levels.

For example, my first trip was Umrah, which can be done any time of year. The package cost me around $1,500 from Southeast Asia, including flights, 4-star hotel, and group transport. On the other hand, my cousin went for Hajj, and his total bill was nearly $6,000 because it’s seasonal, heavily regulated, and demand skyrockets.

Lesson learned: Decide early. If you’re aiming for Hajj, you need to register sometimes a year or two in advance through authorized agents. With Umrah, you have more flexibility.

  1. Picking the Right Travel Agency (Don’t Skip This Step)

I once booked with a “cheap” tour operator who promised luxury buses and 5-star hotels near the Haram. Guess what? The bus had no air conditioning, and the hotel was a 20-minute walk away in 40°C heat.

Here’s how I now vet agencies:

  • Check if they’re licensed by the Saudi Ministry of Hajj and Umrah. If not, run.
  • Ask about hotel distance in minutes, not just “near Haram.” Five minutes could mean across the street, or it could mean a 2 km walk uphill.
  • Compare group size. Smaller groups usually get more attention and better logistics.
  • Look for package transparency. Hidden fees are common—airport transfers, meals, even visa processing can be extra.
  1. Best Time to Visit Makkah (Weather & Crowds Matter)

Timing can make or break your trip. I once went in July for Umrah—big mistake. The heat was relentless, with temperatures touching 45°C. By the time I reached the Kaaba for Tawaf, I was drenched in sweat and running low on energy.

If you can, plan your Umrah in December to February. The weather is mild (around 20–25°C), and your body won’t feel as drained. For Hajj, of course, you don’t get a choice—the Islamic calendar decides for you.

  1. The Flight Experience: Layovers and Jet Lag

Flying to Jeddah or Madinah can be an adventure in itself. My first trip had a 12-hour layover in Doha, and I didn’t think to book a transit hotel. Worst night’s sleep ever, curled up on plastic chairs.

Pro tip: If you’re traveling long-haul, always book a layover hotel or choose a package with direct flights if your budget allows. And try to adjust your sleep schedule before departure—you’ll thank yourself later when you arrive in Saudi Arabia with enough energy for prayers and rituals.

  1. Packing for Makkah: What I Regret and What I Loved

Oh boy, packing for Makkah taught me a lot. The first time, I overpacked—heavy jeans, multiple coats, and way too many shoes. I ended up wearing the same 2 light outfits over and over because they were comfortable.

Here’s what’s actually useful:

  • Light, breathable clothing. Cotton or linen works best.
  • A small backpack. Essential for carrying water, prayer mats, and snacks during long days.
  • Comfortable sandals or slippers. You’ll walk miles every day. Don’t bring new shoes—break them in first.
  • Portable fan or cooling towel. A lifesaver in the heat.
  • Medication. Painkillers, rehydration salts, and anything you might need—pharmacies are there, but crowded.

What I regret bringing: heavy winter jackets, big camera (my phone was enough), and way too many toiletries.

  1. Hotels in Makkah: Location Beats Luxury

Hotels in Makkah are a whole world on their own. I once stayed in a 3-star hotel 1.5 km from Masjid al-Haram, and trust me, that “short” walk felt endless after a full day of rituals. On another trip, I splurged on a hotel directly facing the Haram—it was pricier, but the convenience was priceless.

Lesson: If your budget allows, pick a hotel within 500 meters of the Haram. You’ll save time, energy, and your feet.

  1. Food in Makkah: Don’t Expect Home Cooking

Food can be tricky. I once ordered biryani expecting a spicy kick, but it was bland compared to what I’m used to. And don’t even get me started on overpriced coffee near the Haram.

But here’s the good part—there are endless options. From shawarma stands to international chains like KFC and Al Baik (Saudi Arabia’s fried chicken legend), you’ll never go hungry. My personal favorite? Fresh dates and laban (a yogurt drink) after long prayers.

  1. Transportation Around Makkah

Transport can test your patience. During peak times, like after Jummah, it took me 45 minutes just to get a taxi.

Tips from trial and error:

  • Use group buses provided by your agency. They’re not always comfy, but they’re reliable.
  • If you’re solo, download ride-hailing apps like Careem or Uber. Much smoother than bargaining with taxis.
  • Walk when you can. It’s often faster than sitting in traffic.
  1. Spiritual Preparation (More Important Than Packing)

This might sound obvious, but the first time I went, I was so focused on logistics that I neglected my spiritual preparation. I memorized the duas last minute, and I felt lost during Tawaf.

What helped me later:

  • Read guidebooks on Umrah and Hajj rituals. Even a small pocket book is handy.
  • Watch YouTube walkthroughs. Visualizing the steps beforehand gave me confidence.
  • Set spiritual goals. Whether it’s finishing the Qur’an or improving salah, it makes the journey more meaningful.
  1. Dealing with Crowds (Patience, My Friend)

If you’re not a fan of crowds, brace yourself. Makkah during peak season feels like the world’s busiest train station. I remember once being so frustrated during Tawaf because people kept bumping into me. But then I reminded myself: everyone’s here for the same purpose. That shift in mindset calmed me down instantly.

Best tip? Don’t rush. Go at your own pace, and accept that being jostled is part of the experience.

  1. Women Traveling to Makkah

I traveled once with my sister, and we noticed women often face unique challenges. Prayer spaces get crowded quickly, and sometimes group tours don’t cater well to women’s needs.

My sister’s advice:

  • Pack an abaya that’s lightweight but not see-through.
  • Bring safety pins and extra hijabs. You’ll thank yourself later.
  • Join women’s study circles in the Haram. They’re welcoming and very helpful.
  1. Money Matters in Makkah

Here’s the thing—currency exchange in Makkah can be expensive if you don’t plan ahead. I once exchanged at the airport and lost a chunk of money in fees.

Now I do this instead:

  • Exchange half your money before traveling.
  • Use ATMs in Saudi—they usually give decent rates.
  • Carry small bills for tips. Porters, drivers, and service staff often expect a little something.
  1. Health Tips for Makkah Travel

On my first trip, I caught a nasty cold because I didn’t wear a mask in crowded areas. Now, I always bring a box of disposable masks and hand sanitizer.

Other must-dos:

  • Drink plenty of water. Dehydration sneaks up fast.
  • Avoid eating too heavy before Tawaf—it can make you feel dizzy.
  • Rest when you need to. Don’t push yourself too hard.
  1. Shopping in Makkah: Souvenirs and What’s Worth It

I’ll admit, I went a little overboard the first time. I bought giant prayer rugs, liters of Zamzam water, and more dates than I could carry. Customs was not happy.

Now I keep it simple:

  • Tasbeeh beads, small Qur’ans, and dates make perfect gifts.
  • Perfume oils (attar) are popular and lightweight.
  • Skip the oversized rugs unless you want extra luggage fees.
  1. My Biggest Mistakes in Makkah Travel

  • Overpacking (seriously, don’t bring heavy clothes).
  • Ignoring health (I got dehydrated fast).
  • Booking with a cheap, unverified agency.
  • Forgetting to adjust my sleep before the trip.

Each mistake taught me something that made the next trip smoother.

  1. Final Thoughts: Makkah Changes You

Traveling to Makkah isn’t just another trip. It’s emotional, challenging, and sometimes overwhelming. But it’s also deeply rewarding. Each time I’ve gone, I’ve come back with more patience, humility, and gratitude.

If you’re planning your first journey, don’t stress about being perfect. Just prepare as best as you can—logistically and spiritually—and leave room for the unexpected. Because trust me, in Makkah, the unexpected is often where the most beautiful memories are made.

SEO-Optimized FAQ

Q1: How much does it cost to travel to Makkah for Umrah?
Umrah packages usually range from $1,200 to $2,500 depending on the season, hotel location, and flight routes.

Q2: Can I travel to Makkah without a tour agency?
Technically yes, but it’s strongly recommended to go through an authorized agency because of visa, accommodation, and transport arrangements.

Q3: What is the best time to visit Makkah?
For Umrah, December to February offers the best weather. Hajj dates are fixed by the Islamic calendar.

Q4: How far are most hotels from Masjid al-Haram?
It varies—some are across the street, others are 2 km away. Always check walking distance in minutes.

Q5: What should I pack for Makkah?
Light clothing, comfortable sandals, a small backpack, medications, and a portable fan. Avoid heavy or unnecessary items.

Working together for real estate success: how shared ideologies can boost property entrepreneurship

Working together for real estate success: how shared ideologies can boost property entrepreneurship

Real estate entrepreneurship can be highly lucrative, regardless of what you put into your portfolio. However, if you’re considering property development as a solo affair, or with a view to ignoring shared ideologies, you may be missing out on some fantastic growth opportunities.

Many people focus on the greater good as part of their real estate entrepreneurship goals – after all, developing properties supports communities and people in need. However, there are a few areas you can tap into to drive sustainable portfolio growth while giving back to society and the world around you.

Let’s explore a few shared ideologies you can explore while building a real estate portfolio or entrepreneurship for long-term success.

Sustainable development

Eco-friendly, environmentally focused housing developments are increasingly popular with broader society. Also, for commercial properties and industrial setups, green initiatives can help to cement a positive public image and, in some cases, drive down costs.

Immersing oneself in sustainable projects as part of a real estate portfolio can help you find interest from people who are keen to invest in low-cost properties balanced with low carbon demands. Eco-conscious buyers are no longer a niche market – and sustainable housing is increasingly resilient amid fluctuating inflation and a continued reliance on fossil fuels.

Real estate entrepreneurs such as Rofino Licuco focus on sustainable developments for communities that face exorbitant energy costs and limited access to reliable infrastructure. In fact, Licuco focuses on renewable energy as part of his activities to help reduce household costs and create jobs in communities within Mozambique.

Embracing sustainable developments genuinely helps people to find more affordable and accessible housing in an unstable market.

Community focus

It is perhaps tempting for some real estate developers and entrepreneurs to invest in individual properties and buildings and to build an entirely varied portfolio. However, by immersing oneself in designing communities and raising neighborhoods, it’s possible to do genuine good for a lot of people beyond simply offering them somewhere to live.

Real estate developers who focus on communities can invest in mixed-use properties and affordable housing to help disadvantaged people access new homes without having to borrow increasing amounts of money. Embracing communities also allows real estate developers to tap into new, potentially higher-value projects.

For example, partnering with local organizations and listening to citizens’ needs will enable developers to launch projects that genuinely support people for years to come. This might include building schools, doctors’ surgeries or other public services where there might not be much free access.

Design philosophies

While we all have our own personal tastes and aesthetic preferences, it’s wise to collaborate with others on design philosophies and principles. This should especially be the case when it comes to designing and building properties for others to move into and use.

Real estate entrepreneurs might do well to work closely with local architects and town planners to design and invest in properties that both blend with the local scenery and offer accessibility for people who are likely to use them. For example, a community with a large elderly population may benefit from smaller homes or those with additional access support.

By collaborating with others on local projects, real estate developers can also learn more about what made certain buildings, homes and facilities successful long term. What aesthetics and physical features made those buildings stand out and sell more compared to others? What are their long-term value prospects, and how can you emulate them for future investments?

It’s vital that real estate entrepreneurs carefully consider opinions and tastes outside of their own to help transform communities and drive safe financial returns. There are developers who take the more maverick approach and stand out from the crowd – but for more sustainable income and community benefits, it’s wise to follow popular and proven design philosophies.

Ethical practices

More than ever, people genuinely care about where their products have come from, and what has gone into the buildings they live in and use. On top of this, real estate developers should be open and transparent about the tools they use, the people they work with, and the values they get behind. Doing so can help them build more sustainable relationships with project managers, architects, other investors and the communities they are working with.

Real estate entrepreneurs need to be critical about the work they do and to be wholly open about their processes. Thanks to our online society, it is harder than ever to conceal shady activities – though this should not be the driving force behind abandoning them!

Beyond following real estate’s fundamentals, developers should always be open to new ideas. Ultimately, no real estate developer or entrepreneur should be an island. 

For long-term portfolio success, and to drive genuine value and interest in the communities they help to build and support, transparency and the willingness to work with others and their viewpoints are key.